Table of Contents
The Charm of Homemade Crumb Donuts
When it comes to comfort baking, crumb donuts hold a special place in my heart. Growing up, Saturday mornings meant a trip to our local bakery, where I’d press my nose against the glass display case, eyes fixed on those glorious, crumb-topped treats. Years later, I discovered that making crumb donuts at home not only fills your kitchen with an intoxicating aroma but also delivers a freshness that store-bought versions simply can’t match.
These delightful crumb donuts combine two beloved classics: the airy, tender texture of a perfect donut and the irresistible buttery crumb topping reminiscent of New York-style crumb cake. The contrast between the soft donut and the slightly crunchy, sweet crumbs creates a textural symphony that makes these treats absolutely addictive.
What makes this crumb donuts recipe special is its approachability. Even if you’ve never attempted homemade donuts before, I’ll guide you through each step with care. The dough comes together easily, and while there is some waiting involved (hello, rise time!), the actual hands-on work is surprisingly simple. Plus, I’ve tested this recipe dozens of times to ensure it’s as foolproof as possible.
So tie on your apron, dust your countertop with flour, and let’s create some bakery-worthy crumb donuts that will have everyone asking for seconds!
What You’ll Need for Perfect Crumb Donuts
Donut Dough Ingredients
Before we dive into making these heavenly crumb donuts, let’s gather everything we need. The beauty of this crumb donuts recipe is that it uses pantry staples you likely already have on hand:
- 2¼ cups all-purpose flour – The foundation of our donut dough
- ½ cup granulated sugar – For just the right sweetness
- 2¼ teaspoons active dry yeast (one standard packet)
- ½ teaspoon salt – To balance the sweetness
- ⅔ cup warm milk (around 110°F) – The perfect temperature to activate the yeast
- 2 large eggs, room temperature – For structure and richness
- ¼ cup unsalted butter, softened – For tenderness and flavor
- 1 teaspoon vanilla extract – For that wonderful aroma
Crumb Topping Ingredients
The signature feature of these crumb donuts is, of course, the irresistible crumb topping:
- 1 cup all-purpose flour
- ½ cup brown sugar, packed – Adds caramel notes
- ¼ cup granulated sugar – For sweetness and structure
- 1 teaspoon ground cinnamon – For warmth and spice
- ¼ teaspoon salt
- ½ cup unsalted butter, melted – The key to those perfect crumbs
- 1 teaspoon vanilla extract – For depth of flavor
Equipment You’ll Need
- Stand mixer with dough hook (or good ol’ elbow grease)
- Large mixing bowl
- Medium bowl for crumb mixture
- 3-inch round cutter (or a drinking glass)
- Baking sheets
- Parchment paper
- Kitchen thermometer (for frying)
- Dutch oven or heavy-bottomed pot
- Spider strainer or slotted spoon
- Cooling rack
- Paper towels
- Vegetable oil for frying (about 2 quarts)
Making the Perfect Donut Dough
Creating the foundation for our crumb donuts starts with a pillowy, tender dough. Don’t be intimidated by working with yeast – I’ll walk you through it step by step!
Step 1: Activate the Yeast
In the bowl of your stand mixer, combine the warm milk (around 110°F – think warm bath water) and 1 tablespoon of the granulated sugar. Sprinkle the yeast over the top and let it sit for about 5-10 minutes until foamy. This foaming action tells you your yeast is alive and ready to work its magic!
Step 2: Mix the Dough
Once your yeast is activated, add the remaining sugar, eggs, softened butter, and vanilla extract to the bowl. Mix on low speed until combined.
Gradually add the flour and salt, continuing to mix on low speed. Once all the flour is incorporated, increase to medium speed and knead for about 5 minutes until the dough is smooth and elastic. It should pull away from the sides of the bowl but might still be slightly sticky.
Step 3: First Rise
Transfer the dough to a lightly greased bowl, cover with plastic wrap or a clean kitchen towel, and place in a warm spot to rise until doubled in size, about 1 to 1½ hours. I like to turn my oven on for just a minute, then turn it off and place the bowl inside – it creates the perfect warm environment!
Step 4: Shape the Donuts
Once your dough has doubled, gently punch it down to release the air bubbles. Transfer to a floured surface and roll out to about ½-inch thickness.
Using your round cutter or glass, cut out as many circles as possible. Place them on parchment-lined baking sheets, leaving about 2 inches between each. Gather the scraps, re-roll, and cut more donuts until all the dough is used.
Step 5: Second Rise
Cover your shaped crumb donuts loosely with plastic wrap or a kitchen towel and let them rise again for about 30-45 minutes until puffy. This second rise is crucial for achieving that light, airy texture we all love in a perfect donut!
Creating That Irresistible Crumb Topping
While your shaped donuts are rising for the second time, let’s prepare the signature element of our crumb donuts – that gloriously buttery, sweet crumb topping that makes these treats so special.
Step 1: Mix the Dry Ingredients
In a medium bowl, whisk together the flour, brown sugar, granulated sugar, cinnamon, and salt until well combined.
Step 2: Add the Wet Ingredients
Pour in the melted butter and vanilla extract. Using a fork or your fingers, mix until the mixture forms moist crumbs of various sizes. You want some larger chunks and some smaller bits for the perfect crumb texture.
Set this mixture aside while you prepare to fry your donuts. The beauty of this crumb topping is that it stays fresh while waiting, and actually benefits from a little time for the flavors to meld.
Frying Your Crumb Donuts to Golden Perfection
Now comes the exciting part – transforming your dough into hot, fresh crumb donuts! If you’ve never fried donuts before, don’t worry. I’ll share all my tips for success.
Step 1: Heat the Oil
In a Dutch oven or heavy-bottomed pot, heat about 2-3 inches of vegetable oil to 350°F. A thermometer is really helpful here – temperature is crucial for properly cooked donuts that aren’t greasy.
Step 2: Fry the Donuts
Working in small batches (2-3 donuts at a time), carefully lower the donuts into the hot oil. Fry for about 1-1½ minutes per side until golden brown. Be careful not to overcrowd the pot, as this will lower the oil temperature and result in greasy donuts.
Step 3: Drain and Cool
Using your spider strainer or slotted spoon, remove the fried donuts and place them on a paper towel-lined tray to absorb excess oil. Let them cool just slightly – you want them warm but not too hot when you apply the crumb topping.
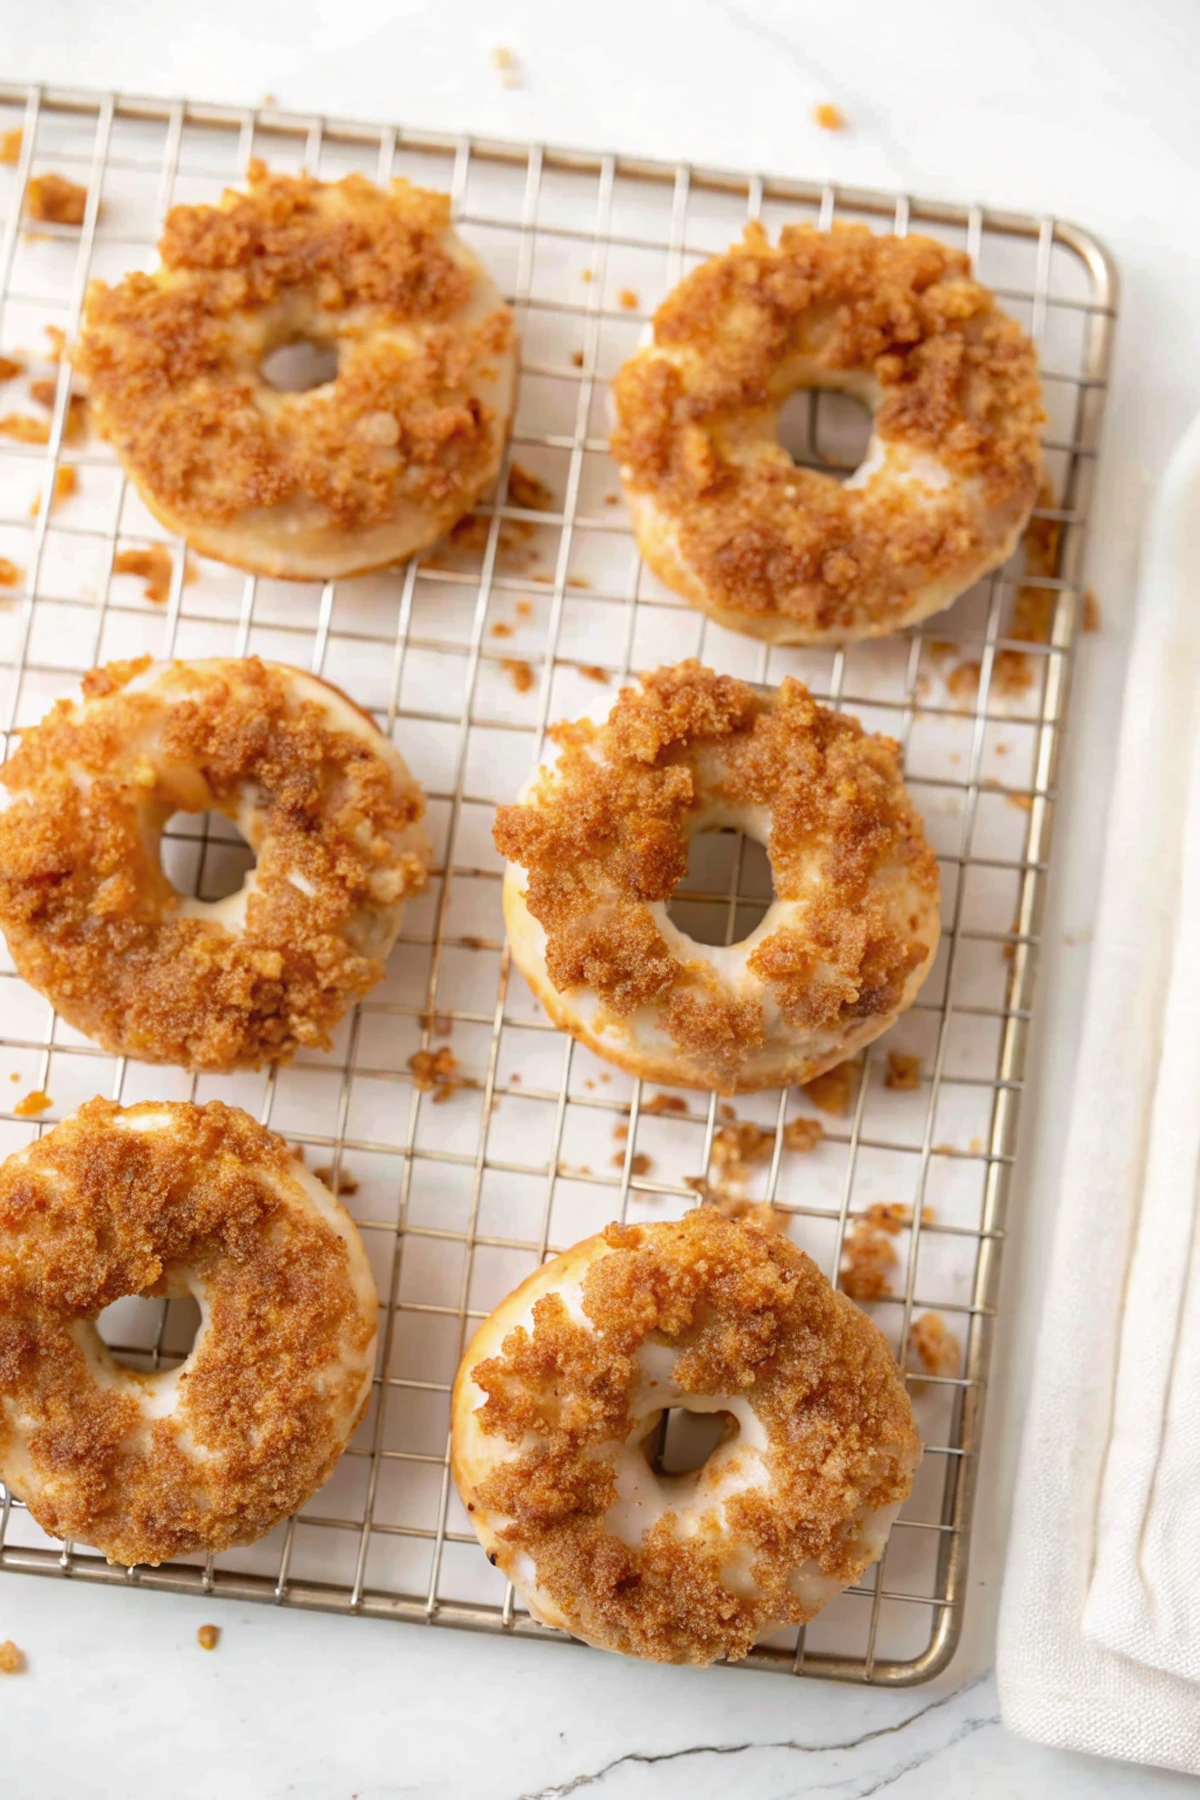
Applying the Crumb Topping
This is where our crumb donuts really come to life! There’s a specific technique to getting that perfect crumb coating that stays put.
Step 1: Prepare a Glaze Adhesive
To help the crumbs stick, we’ll make a quick adhesive glaze:
- Mix 1 cup powdered sugar with 2-3 tablespoons milk and ½ teaspoon vanilla extract
- Stir until smooth – it should be thick enough to coat the back of a spoon
Step 2: Dip and Coat
Working with one donut at a time while they’re still warm (but not hot):
- Dip the top of each donut into the glaze, allowing excess to drip off
- Immediately press the glazed top into the crumb mixture, gently pushing to adhere
- Place on a cooling rack, crumb side up
- Let set for about 10 minutes
The glaze acts as the perfect “glue” for our crumb topping, ensuring those delicious morsels stay put when you take that first heavenly bite of your homemade crumb donuts.
Variations to Try with Your Crumb Donuts Recipe
One of the joys of mastering a basic crumb donuts recipe is that you can customize it in countless ways! Here are some of my favorite variations that will keep your donut game fresh and exciting:
Chocolate Crumb Donuts
Add ¼ cup cocoa powder to your donut dough and reduce the flour by the same amount. For chocolate crumbs, add 2 tablespoons cocoa powder to your crumb mixture. Double chocolate heaven!
Apple Cinnamon Crumb Donuts
Fold ½ cup of finely diced sautéed apples (cooled) into your dough before the first rise, and add an extra ½ teaspoon of cinnamon to both the dough and crumb mixture for an autumn-inspired treat.
Lemon Crumb Donuts
Add 1 tablespoon of lemon zest to your donut dough and replace the vanilla in the glaze with 1 tablespoon fresh lemon juice for a bright, citrusy version of these crumb donuts.
Mini Crumb Donuts
Use a smaller cutter (about 2 inches) to create adorable mini crumb donuts – perfect for parties or when you want “just a little something sweet.” Reduce the frying time to about 45 seconds per side.
Baked Crumb Donuts Option
If you prefer not to fry, you can bake these donuts in a 350°F oven for about 12-15 minutes until golden. The texture will be different – more like a soft roll than a traditional donut – but still delicious with the crumb topping!
Storage and Make-Ahead Tips
Like most homemade donuts, these crumb donuts are absolutely at their peak freshness on the day they’re made. However, with proper storage, you can enjoy them for a few days:
Short-Term Storage
Store completely cooled crumb donuts in an airtight container at room temperature for up to 2 days. Place parchment paper between layers to prevent the crumbs from getting smooshed.
Freezing Options
You can freeze these crumb donuts! Once completely cooled, place them in a single layer on a baking sheet and freeze until solid. Then transfer to a freezer-safe container or bag and store for up to 3 months. Thaw at room temperature and warm slightly in the microwave (10-15 seconds) before enjoying.
Make-Ahead Convenience
If you want fresh crumb donuts without the full morning preparation:
- Make the dough the night before and let it go through the first rise
- Punch down, cover tightly, and refrigerate overnight
- In the morning, let the dough sit at room temperature for 30 minutes
- Shape, allow for the second rise (which may take a bit longer since the dough is cold), and proceed with frying and topping
This approach lets you enjoy warm, fresh crumb donuts for breakfast without the full time commitment!
Troubleshooting Your Crumb Donuts
Even experienced bakers encounter issues sometimes! Here are solutions to common problems when making crumb donuts:
Dense Donuts
If your crumb donuts turned out dense rather than light and airy, your yeast might not have activated properly, or the dough didn’t rise long enough. Make sure your milk is warm (not hot), and give the dough enough time to double in size during both rises.
Crumbs Falling Off
If the crumbs aren’t adhering well to your donuts, your glaze might be too thin or the donuts might be too hot when you’re applying the topping. Make sure your glaze is thick enough to coat the back of a spoon, and let the donuts cool just slightly before topping.
Greasy Donuts
Greasy crumb donuts usually mean the oil temperature was too low. Invest in a good thermometer and make sure your oil stays around 350°F. Also, don’t overcrowd the pot when frying.
Dough Too Sticky
If your dough is excessively sticky and difficult to work with, add flour gradually, just a tablespoon at a time, until it reaches a manageable consistency. Be careful not to add too much, as this can make your crumb donuts tough.
Why Homemade Crumb Donuts Beat Store-Bought Every Time
There’s something truly special about homemade crumb donuts that even the best bakeries can’t replicate. When you make them at home:
- You’re enjoying them at peak freshness, mere minutes after frying
- You control the quality of ingredients (no preservatives or artificial flavors)
- You can adjust the sweetness and flavors to your preference
- The aroma that fills your home is an experience in itself
- There’s that irreplaceable pride in creating something delicious with your own hands
Plus, making crumb donuts at home becomes a memory-making activity. Some of my fondest kitchen memories involve Saturday mornings making these treats with my nieces and nephews, who love to help shape the dough and (especially) apply the crumb topping!
Frequently Asked Questions About Crumb Donuts
Can I make the crumb donuts recipe without a stand mixer?
Absolutely! While a stand mixer makes the process easier, you can mix the dough by hand. Combine the ingredients as directed in a large bowl, then knead on a floured surface for about 8-10 minutes until smooth and elastic.
Why didn’t my yeast activate?
If your yeast didn’t foam up, it might be old or the milk might have been too hot or too cold. Yeast works best in liquid that’s around 110°F – like warm bath water. Too hot will kill the yeast, too cold won’t activate it.
Can I use instant yeast instead of active dry yeast?
Yes! Use the same amount of instant yeast, but you can skip the activation step and add it directly to your dry ingredients.
How do I know when the oil is at the right temperature without a thermometer?
Drop a small piece of dough into the oil – it should sizzle and rise to the surface quickly, but not burn. If it browns too quickly, your oil is too hot. If it just sits there, the oil isn’t hot enough.
Why are my crumb donuts tough instead of tender?
Tough crumb donuts usually result from overworking the dough or adding too much flour. Handle the dough gently and add flour sparingly when rolling out.
Can I make crumb donuts without eggs?
You can substitute each egg with ¼ cup unsweetened applesauce or a flax egg (1 tablespoon ground flaxseed mixed with 3 tablespoons water, let sit for 15 minutes). The texture will be slightly different but still delicious.
Time to Enjoy Your Homemade Crumb Donuts!
There you have it – your complete guide to making incredible crumb donuts at home! From the tender, pillowy dough to that irresistible sweet crumb topping, these treats are sure to become a favorite in your baking repertoire.
Remember, baking is both an art and a science. Don’t be discouraged if your first batch isn’t perfect – each time you make this crumb donuts recipe, you’ll gain confidence and skill. The joy is in the process as much as in the delicious results!
I’d love to hear about your crumb donut adventures! Did you try one of the variations? Did you discover a new twist of your own? Drop a comment below sharing your experience or your favorite way to enjoy these treats. And if you share photos on social media, be sure to tag them so I can see your beautiful creations!
Happy baking, and enjoy every crumb-covered bite of these homemade delights!
Hungry for more? Check out our top rated recipes :