Table of Contents
Why Homemade Granola Bars Will Change Your Snack Game Forever
There’s something magical about pulling a tray of golden, fragrant baked granola bars from the oven. The aroma of toasted oats, nuts, and honey filling your kitchen is enough to make anyone’s mouth water. I’ll never forget the first time I made my own granola bars – I was absolutely shocked by how much better they tasted than the store-bought versions I’d been eating for years.
If you’ve been relying on those individually wrapped commercial granola bars, you’re in for a delightful surprise. Homemade baked granola bars aren’t just tastier – they’re healthier, more affordable, and completely customizable to your preferences. Plus, you’ll know exactly what’s going into them (goodbye, mysterious ingredients and excessive sugar!).
In this post, I’m sharing my favorite baked granola bars recipe that’s stood the test of time in my kitchen. Whether you’re looking for easy baked granola bars to pack in lunchboxes, a healthy breakfast option, or a satisfying afternoon pick-me-up, these versatile treats have got you covered.
The Secret to Perfect Baked Granola Bars (Every Single Time)
After years of granola bar experimentation (and yes, some memorable failures), I’ve discovered what makes the difference between bars that hold together beautifully and those that crumble into granola the moment you try to cut them.
The Perfect Base Ingredients
Every successful batch of baked granola bars starts with the right foundation:
- Old-fashioned rolled oats: These provide the perfect chewy texture. Quick oats work in a pinch, but they create a denser bar.
- Binding agent: Honey, maple syrup, or brown rice syrup all work beautifully. This is what holds everything together.
- Fat component: Nut butter, coconut oil, or butter helps create that perfect chewy-crisp texture.
- Mix-ins: This is where the fun begins! Nuts, seeds, dried fruit, chocolate chips – the possibilities are endless.
The Magic Ratio
The secret to baked granola bars that hold together isn’t just about the ingredients – it’s about proportion. Too dry, and they’ll crumble. Too wet, and they’ll never set properly. For perfect bars every time, aim for roughly:
- 2.5 cups dry ingredients (oats, nuts, seeds)
- 1/2 cup binding liquid (honey, maple syrup)
- 1/3 cup fat (nut butter, coconut oil)
This ratio creates that perfect balance of chewiness and structural integrity we’re all looking for in our healthy baked granola bars.
Easy Baked Granola Bars Recipe: The Basic Formula
Let’s start with my go-to baked granola bars recipe that serves as the perfect foundation for endless variations. This recipe yields about 12 bars and takes less than 15 minutes of active preparation time.
Ingredients
- 2 cups old-fashioned rolled oats
- 1/2 cup chopped almonds (or nut of choice)
- 1/4 cup pumpkin seeds
- 1/4 cup sunflower seeds
- 1/3 cup honey (or maple syrup for vegan option)
- 1/4 cup natural peanut butter (or almond butter)
- 1/4 cup coconut oil, melted
- 1 teaspoon vanilla extract
- 1/2 teaspoon cinnamon
- 1/4 teaspoon salt
- 1/3 cup mini chocolate chips (optional)
- 1/3 cup dried cranberries or cherries (optional)
Equipment You’ll Need
- 8×8 inch baking pan
- Parchment paper
- Large mixing bowl
- Small saucepan
- Measuring cups and spoons
- Wooden spoon or spatula
Step-by-Step Instructions
Preheat and prepare: Set your oven to 325°F (165°C). Line your baking pan with parchment paper, leaving some overhang on the sides to make lifting the bars out easier.
Toast the dry ingredients: Spread your oats, nuts, and seeds on a baking sheet and toast them in the oven for about 10 minutes, stirring halfway through. This enhances their flavor tremendously and is a step worth not skipping! Once toasted, transfer to a large bowl.
Prepare the binding mixture: In a small saucepan over low heat, warm the honey, peanut butter, and coconut oil until melted and well combined. Remove from heat and stir in the vanilla, cinnamon, and salt.
Combine wet and dry: Pour the warm liquid mixture over your toasted oats and nuts. Stir thoroughly to coat every bit of the dry ingredients. Let the mixture cool for about 5 minutes if you’re adding chocolate chips (so they don’t completely melt).
Add mix-ins: Fold in your dried fruit and chocolate chips if using. The mixture should look sticky and well-combined.
Press firmly: Transfer your mixture to the prepared baking pan. Here’s the crucial part: press it down REALLY firmly. I mean it! Use the back of a measuring cup or your hands (slightly dampened to prevent sticking) and apply significant pressure. This compression is key to bars that hold together.
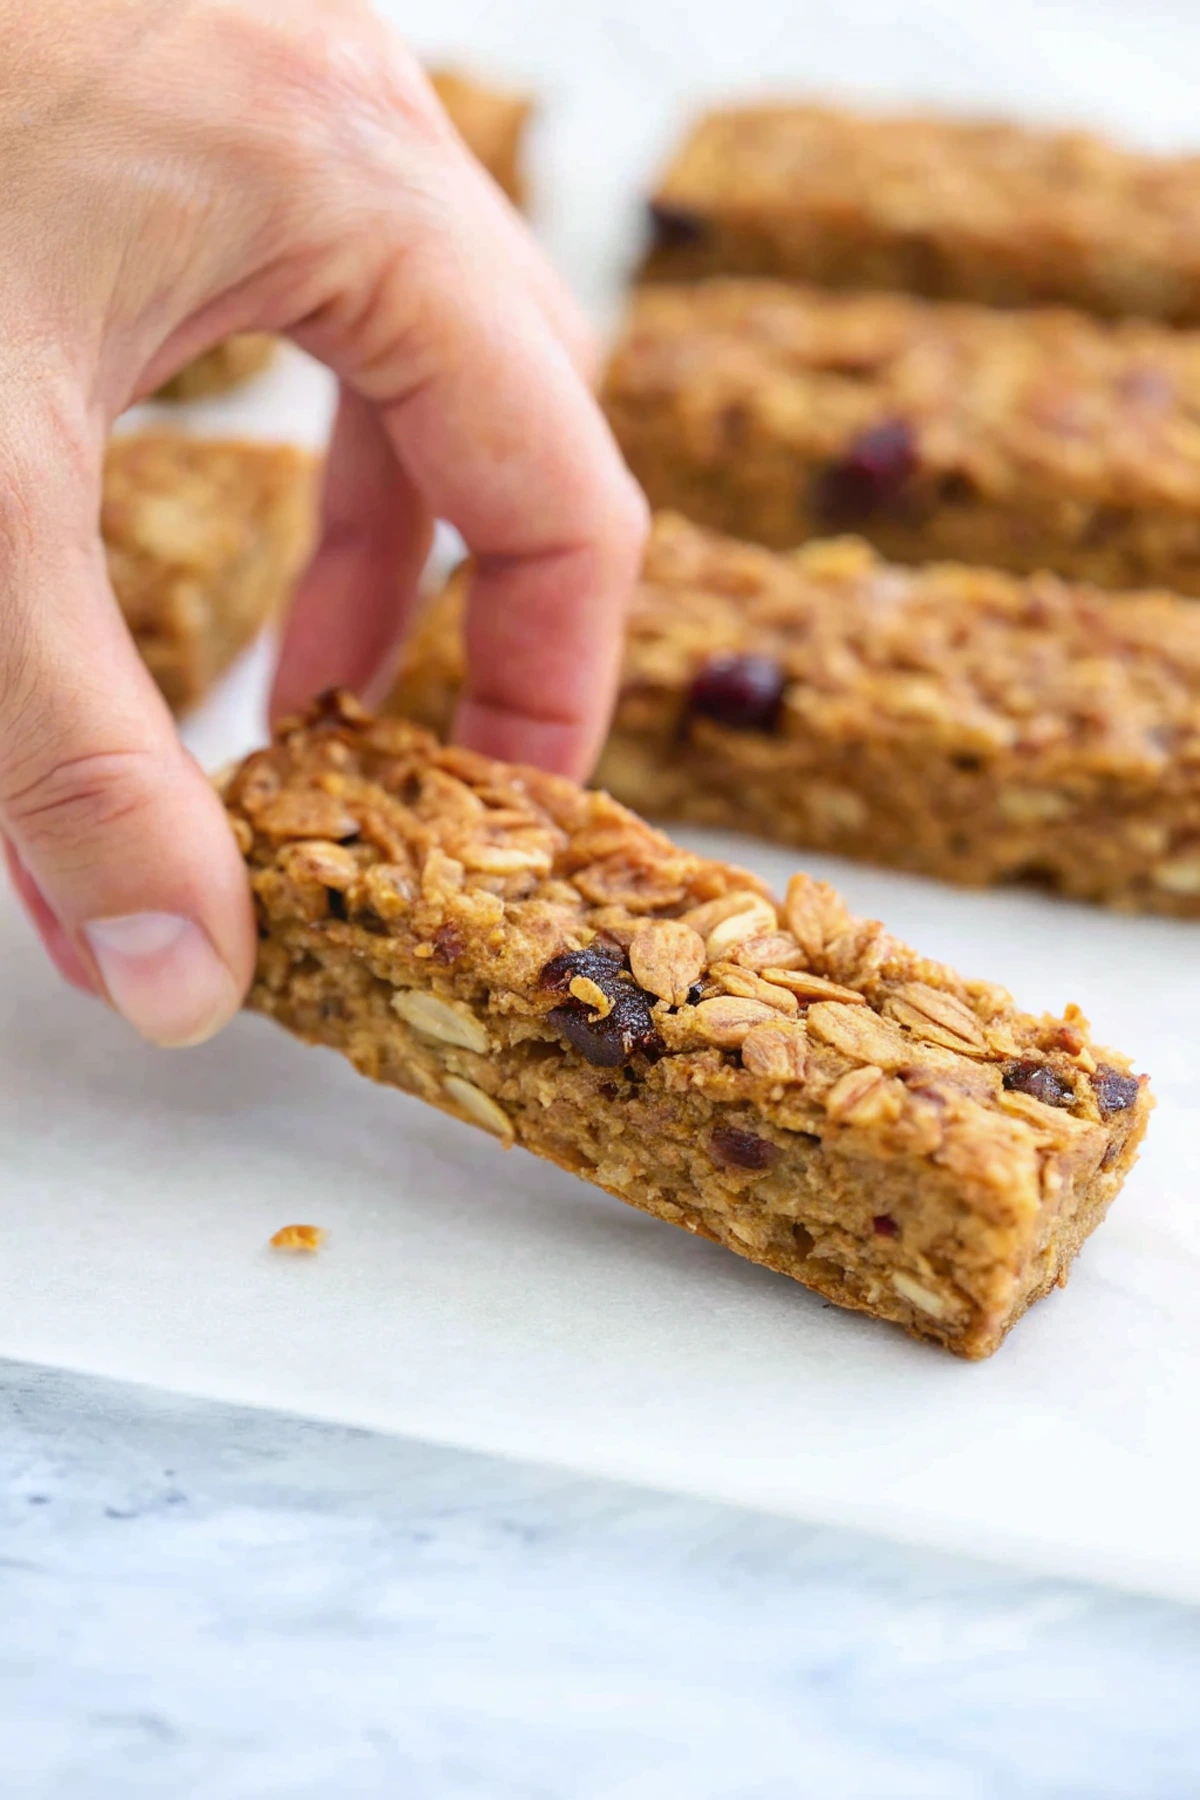
Bake to perfection: Bake for 25-30 minutes until the edges turn golden brown. The center might still seem a bit soft – that’s perfect! They’ll firm up as they cool.
Cool completely: This is non-negotiable for baked granola bars that hold their shape. Let them cool in the pan for at least 30 minutes, then transfer (still in the parchment) to the refrigerator for at least 2 hours before cutting.
Cut and store: Use a sharp knife to cut into bars or squares. Store in an airtight container at room temperature for up to a week, or refrigerate for up to two weeks. They also freeze beautifully for up to 3 months!
Baked Granola Bars Healthy Variations: Make Them Your Own
One of the best things about making homemade baked granola bars is the ability to customize them to your dietary needs and flavor preferences. Here are some of my favorite variations that keep things healthy while offering delicious diversity:
Protein-Packed Power Bars
- Add 1/4 cup protein powder (vanilla or unflavored works best)
- Increase nut butter to 1/3 cup
- Add 2 tablespoons chia seeds or hemp hearts
- Mix in 1/4 cup chopped dates for natural sweetness
These make an excellent post-workout snack or breakfast on busy mornings. The extra protein helps keep you fuller longer while supporting muscle recovery.
Fruit and Nut Breakfast Bars
- Replace half the oats with a mixture of chopped dried apricots, figs, and raisins
- Use a mixture of walnuts, pecans, and almonds
- Add orange zest for a citrusy brightness
- Swap honey for maple syrup for a different flavor profile
These fruit-forward bars make an excellent grab-and-go breakfast option that provides sustained energy throughout the morning.
Chocolate Lover’s Baked Granola Bars
- Add 2 tablespoons cocoa powder to the dry ingredients
- Use chocolate protein powder if desired
- Mix in dark chocolate chips and dried cherries
- Drizzle with melted dark chocolate after cooling
Who says healthy baked granola bars can’t satisfy your sweet tooth? These chocolate-forward bars are still nutritious but feel like a treat.
Nut-Free School-Safe Option
- Replace nuts with additional seeds (sunflower, pumpkin, hemp)
- Use sunflower seed butter instead of peanut butter
- Add extra cinnamon and a touch of nutmeg
- Consider adding dried apples and a touch of maple extract
Perfect for school lunchboxes where nut allergies are a concern, these bars are just as delicious and hold together beautifully.
Troubleshooting Your Baked Granola Bars
Even with the perfect recipe, sometimes things don’t go exactly as planned. Here’s how to solve the most common baked granola bar issues:
Problem: Bars Are Too Crumbly
Solution: This usually means there’s not enough binding agent or the mixture wasn’t compressed firmly enough before baking.
- Add an extra tablespoon or two of honey or maple syrup
- Make sure to press the mixture very firmly into the pan
- Let them cool completely before cutting
- Consider adding an egg white to the wet ingredients for extra binding power
Problem: Bars Are Too Hard
Solution: Your bars might be overbaked or the ratio of dry to wet ingredients is off.
- Reduce baking time by 5 minutes
- Add a tablespoon more nut butter or oil to the mixture
- Make sure you’re measuring your oats correctly (not packing them too tightly)
Problem: Bars Are Too Sweet
Solution: Easy to fix for your next batch!
- Reduce honey/maple syrup by 2-3 tablespoons
- Increase salt slightly to balance sweetness
- Add more nuts and seeds, fewer dried fruits
- Include ingredients with bitter notes like dark chocolate or cranberries
Problem: Bars Stick to the Pan
Solution: Proper pan preparation is key.
- Always use parchment paper with overhang
- Let bars cool completely before attempting to remove
- If you forgot parchment, try running a knife around the edges and placing in the freezer for 15 minutes before attempting to remove
Make-Ahead and Storage Tips for Baked Granola Bars
One of the best things about homemade baked granola bars is their make-ahead potential. Here’s how to maximize their freshness and convenience:
Batch Preparation
I often make a double batch of these bars on Sunday for easy snacking all week long. Once cooled and cut, I wrap each bar individually in parchment paper or reusable food wrap, then place them in an airtight container.
Refrigeration vs. Room Temperature
- Room temperature storage: Perfect for bars you’ll consume within 5-7 days. Keep in an airtight container.
- Refrigerator storage: Extends freshness to 2 weeks and keeps bars firmer, especially in warm weather.
Freezing Instructions
These baked granola bars freeze beautifully for up to 3 months:
- Wrap individual bars in parchment paper
- Place in a freezer-safe container or zip-top bag
- Label with the date
- Thaw at room temperature for about 30 minutes before enjoying
Lunchbox Tips
For school or work lunches, I recommend taking the bar directly from the refrigerator and placing it in the lunchbox. By lunchtime, it will be the perfect temperature and texture.
Baked Granola Bars for Special Dietary Needs
One of the greatest advantages of making your own baked granola bars is being able to accommodate various dietary restrictions. Here’s how to modify the basic recipe:
Gluten-Free Baked Granola Bars
- Use certified gluten-free oats
- Verify all other ingredients are not cross-contaminated
- Consider adding 2 tablespoons of ground flaxseed to help with binding
Vegan Baked Granola Bars
- Substitute maple syrup or agave for honey
- Use coconut oil instead of butter
- Check that your chocolate chips are dairy-free if using
Lower Sugar Options
- Reduce honey/maple syrup to 1/4 cup
- Add a mashed ripe banana for natural sweetness
- Use unsweetened dried fruits
- Include cinnamon and vanilla for flavor without added sugar
Keto-Friendly Adaptation
- Replace oats with a mixture of chopped nuts and seeds
- Use a sugar-free syrup alternative
- Add unsweetened coconut flakes
- Use a small amount of allulose or erythritol for sweetness
Why My Baked Granola Bars Recipe Stands Out
After testing countless variations, I’ve found that what makes baked granola bars truly exceptional comes down to a few key techniques:
Toasting the dry ingredients: This single step elevates the flavor profile tremendously, creating depth and nuttiness that untoasted ingredients simply can’t match.
The press-and-chill method: The combination of pressing the mixture extremely firmly into the pan and allowing adequate cooling time is non-negotiable for bars that hold together perfectly.
Balance of textures: The ideal granola bar has multiple texture elements – chewy oats, crunchy nuts, tender dried fruits – creating an eating experience that keeps you coming back.
Thoughtful sweetness: Unlike commercial bars that often rely on excessive sugar, these baked granola bars use just enough natural sweeteners to bind the ingredients while letting the natural flavors shine.
Customization potential: This recipe serves as a foundation that you can endlessly adapt to suit your preferences or what you have on hand.
Frequently Asked Questions About Baked Granola Bars
Can I use quick oats instead of rolled oats?
Yes, you can substitute quick oats, but the texture will be denser and less chewy. If using quick oats, reduce the amount by about 1/4 cup as they absorb more moisture than rolled oats.
Why do my granola bars fall apart when I cut them?
The most common reasons are insufficient binding agent, not pressing the mixture firmly enough into the pan, or cutting before they’re completely cooled. Make sure to follow the cooling instructions carefully – patience pays off with perfectly intact bars!
Can I make these without nuts due to allergies?
Absolutely! Simply replace the nuts with additional seeds (pumpkin, sunflower, hemp) or even crispy rice cereal for crunch. Use sunflower seed butter or tahini in place of nut butter.
How can I make my baked granola bars higher in protein?
Add 1/4 cup of protein powder to the dry ingredients, increase the nut or seed butter, and include high-protein mix-ins like hemp hearts. You can also add a beaten egg white to the wet ingredients for both protein and improved binding.
Are homemade baked granola bars healthier than store-bought?
Generally yes! Homemade versions allow you to control the sugar content, avoid preservatives and artificial ingredients, and customize the nutritional profile to your needs. Plus, you can pack them with more nuts, seeds, and whole foods than many commercial options.
Can I make these without baking them?
While this recipe is designed for baking, you can adapt it to a no-bake version by increasing the binding agents slightly and refrigerating until firm. However, you’ll miss out on the toasty flavor that baking provides.
Your Turn to Create Amazing Baked Granola Bars!
Now that you’re armed with all the knowledge you need to make perfect baked granola bars, it’s time to head to the kitchen! Remember, this recipe is more of a template than a strict formula – feel free to play with flavors, adjust sweetness to your liking, and incorporate your favorite ingredients.
I’d love to hear about your granola bar adventures! What variations did you try? Did you discover any amazing flavor combinations? Drop a comment below to share your experience or ask any questions that came up during your baking.
And if you make these bars and love them (which I know you will!), consider taking a photo and sharing it on social media. Tag me so I can see your beautiful creations!
Happy baking, and enjoy your delicious, nutritious homemade baked granola bars!
Hungry for more? Check out our top rated recipes :