Table of Contents
There’s something absolutely magical about the moment a child’s eyes light up when they see their favorite character come to life on their birthday cake. If your little one is obsessed with the lovable blue heeler pup and her family, then a Bluey cake is the perfect centerpiece for their special day. As someone who’s created dozens of character cakes for my own kiddos (and yes, made plenty of frosting mishaps along the way!), I’m excited to walk you through creating a Bluey birthday cake that will have everyone at the party saying “Wackadoo!”
Whether you’re a seasoned baker or someone who typically buys store-bought (no judgment here!), this guide will help you create a celebration-worthy Bluey cake that’s as delicious as it is adorable. We’ll cover everything from baking the perfect base to decorating techniques that capture Bluey’s playful personality. So grab your apron, and let’s make some birthday magic happen!
What Makes the Perfect Bluey Cake?
Before we dive into mixing and measuring, let’s talk about what makes a truly fantastic Bluey cake. The most memorable character cakes balance three key elements: flavor, structure, and decorative details.
The ideal Bluey cake features your child’s favorite cake flavor (because what’s the point if they don’t love eating it?), has enough stability to hold up to decorating, and incorporates recognizable elements from the show. Whether you’re aiming for a 3D sculptured cake that looks exactly like Bluey or a simpler sheet cake with Bluey cake toppers, the principles remain the same.
Remember, the perfect Bluey cake isn’t necessarily the most complex one—it’s the one that makes your little fan’s face light up with joy!
Essential Ingredients and Supplies
For the Cake:
- 3 cups all-purpose flour
- 2½ cups granulated sugar
- 1 tablespoon baking powder
- 1 teaspoon salt
- 1 cup unsalted butter, softened
- 4 large eggs, room temperature
- 1 cup whole milk
- 2 teaspoons vanilla extract
- Blue food coloring (gel colors work best)
For the Frosting:
- 2 cups unsalted butter, softened
- 6 cups powdered sugar
- 4 tablespoons heavy cream
- 2 teaspoons vanilla extract
- Food coloring gels (blue, black, white, red, and tan)
Decorating Supplies:
- Offset spatula
- Piping bags
- Various piping tips (round, star, and leaf tips work well)
- Cake boards
- Optional: fondant for detailed Bluey features
- Optional: pre-made Bluey cake toppers for an easier approach
- Sprinkles in Bluey-themed colors (blue, orange, red)
Baking Your Base: The Perfect Cake Layers
The foundation of any great Bluey cake is, well, a delicious cake! While the decorations will steal the show visually, the taste is what will have everyone asking for seconds. Let’s start with a reliable vanilla cake that’s sturdy enough for decorating but still moist and flavorful.
Preheat your oven to 350°F (175°C). Grease and line two 8-inch round cake pans with parchment paper.
In a large bowl, whisk together the flour, baking powder, and salt. Set aside.
In your stand mixer (or with a hand mixer), cream the butter and sugar until light and fluffy, about 3-4 minutes. Don’t rush this step—it’s key for a tender crumb!
Add eggs one at a time, mixing well after each addition. Then add the vanilla extract.
Gradually add the dry ingredients to the butter mixture, alternating with milk, beginning and ending with the dry ingredients. Mix until just combined—overmixing is the enemy of tender cake!
If you want a blue-tinted cake interior (always a fun surprise!), divide the batter and color one portion blue with gel food coloring. For a marbled effect, swirl the colored and uncolored batters together gently.
Pour the batter evenly into your prepared pans and smooth the tops with your spatula.
Bake for 30-35 minutes, or until a toothpick inserted into the center comes out clean or with a few moist crumbs.
Allow to cool in pans for 10 minutes before transferring to a wire rack to cool completely.
My Baking Tip: I always wrap my completely cooled cake layers in plastic wrap and chill them in the refrigerator for at least an hour (overnight is even better). This makes them much easier to frost without crumbs getting everywhere!
Creating the Perfect Bluey Frosting
Now for the fun part—bringing Bluey to life with frosting! The secret to a beautiful Bluey cake is getting those vibrant colors just right. Bluey’s signature blue coat, white face, and other details need distinct colors that pop.
In a stand mixer fitted with the paddle attachment, beat the butter until creamy and light in color (about 3-4 minutes).
Gradually add the powdered sugar, 1 cup at a time, mixing well between additions. Add the heavy cream and vanilla, then beat on medium-high speed until light and fluffy (about 5 minutes).
Divide the frosting into separate bowls for coloring:
- The largest portion for Bluey’s blue coat
- Medium portions for white (face) and tan (muzzle/tummy)
- Small portions for black (facial features) and red (tongue/details)
For Bluey’s perfect blue color, combine royal blue with a tiny touch of violet gel coloring. Start with just a small amount and build up—you can always add more, but you can’t take it out!
Frosting Tip: If your kitchen is warm, the frosting might become too soft for piping detailed designs. Pop it in the refrigerator for 10-15 minutes to firm up, but not so long that it becomes too stiff to work with.
Assembling Your Bluey Cake: Building the Base
Before we get to the decorative elements, we need to assemble our cake layers into a solid foundation. Here’s how to build a sturdy base for your Bluey cake:
Place one cake layer on your cake board or serving plate. If your layers baked with a dome, use a serrated knife to level the top for a flat surface.
Spread about 1 cup of frosting evenly on top of the first layer. This will be your filling.
Place the second cake layer on top, flat side up.
Apply a thin layer of frosting all over the cake to lock in crumbs. This is called the “crumb coat.” Don’t worry about it looking perfect—this is just the foundation.
Chill the crumb-coated cake for at least 30 minutes in the refrigerator.
Once chilled, apply a final layer of white frosting all over the cake, smoothing it as much as possible with your offset spatula.
Return the cake to the refrigerator while you prepare your decorating bags with colored frosting.
Assembly Trick: Place small strips of parchment paper under the edges of your cake before frosting. After you’re done decorating, you can pull these out for a clean cake board with no messy frosting smudges!
Decorating Your Bluey Cake: Character Details
Now for the moment of truth—transforming your frosted cake into a recognizable Bluey cake! I’ll walk through two approaches: a 2D decorated top and a more advanced 3D sculpted option.
Option 1: 2D Bluey Decoration (Perfect for Beginners)
Print a simple Bluey face template to use as a guide (or freehand it if you’re feeling confident).
Using a toothpick, lightly trace the outline of Bluey’s face onto the top of your cake.
Fill in Bluey’s face using the white frosting with a flat spatula.
Use the blue frosting to pipe Bluey’s ears and the outside border of the face.
Add tan frosting for the muzzle area.
With black frosting in a small piping bag fitted with a round tip, add Bluey’s eyes, nose, and mouth.
Add any final details like Bluey’s red tongue or rosy cheeks.
Write a birthday message around the sides or bottom of the cake.
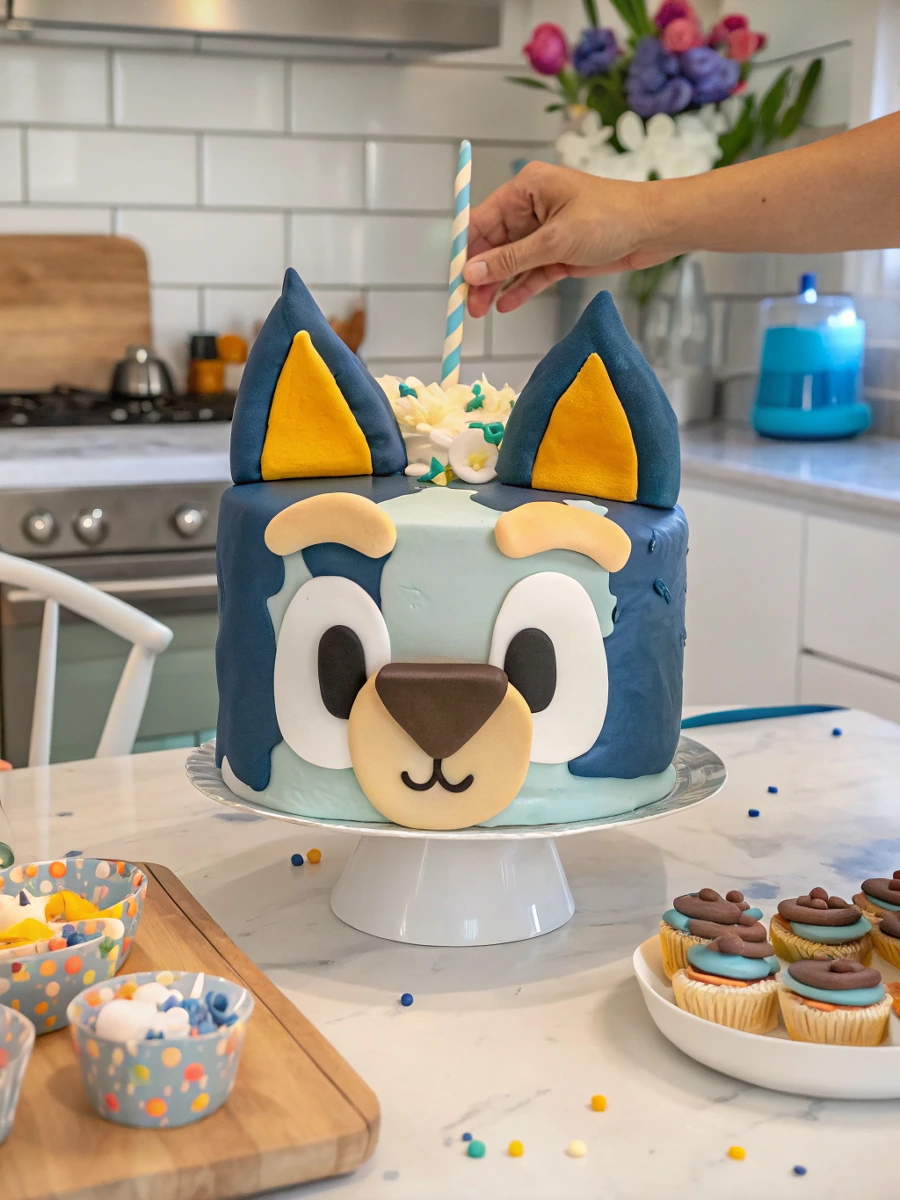
Option 2: 3D Bluey Cake (For More Experienced Bakers)
For a more ambitious Bluey cake, you can carve your stacked cakes into Bluey’s head shape:
Use a printed template to carve the basic head shape, including ears.
Cover the entire carved cake with a crumb coat and chill.
Apply colored frosting in sections—blue for the main coat, white for the face, etc.
Use piping bags with small tips to add facial details.
For truly detailed features, consider using fondant pieces for Bluey’s ears, eyes, and other facial elements.
Decoration Rescue Tip: Made a mistake? Don’t panic! Keep a small bowl of the matching frosting color and a clean, damp brush nearby. You can use this to smooth out lines or fix small errors without starting over.
Easy Bluey Cake Ideas for Time-Pressed Parents
Not everyone has hours to spend on elaborate cake decorating—and that’s perfectly okay! Here are some simpler Bluey cake ideas that still pack a birthday punch:
The Cupcake Approach: Bake cupcakes and arrange them in the shape of Bluey’s face. Frost with blue, white, and tan, then add facial features. This option is great because it requires no cutting at the party!
Sheet Cake Simplicity: Bake a rectangular sheet cake and frost it blue. Use white frosting to create a simple Bluey silhouette on top.
Bluey Cake Topper Triumph: Frost your cake in Bluey’s signature blue color and add store-bought Bluey cake toppers for instant character recognition. Surround with colorful sprinkles that match the show’s palette.
Number Cake: Shape your cake into your child’s age and decorate with blue frosting and Bluey cake toppers around the edges.
Remember, kids are usually thrilled just to see their favorite character represented in any form—the joy is in the recognition, not the perfection!
Using Bluey Cake Toppers Effectively
If you’ve opted to use Bluey cake toppers for your design, here are tips to make them look intentional and polished:
Create a smooth frosting surface for the toppers to stand on.
Consider creating a “scene” from the show using multiple toppers—perhaps Bluey playing with Bingo or the whole Heeler family.
Secure toppers in buttercream that has slightly crusted over so they don’t sink or fall.
Surround the base of plastic toppers with a small piped star border to make them look integrated rather than just placed on top.
If using printed toppers, apply them just before serving to prevent moisture from the cake affecting the paper.
A well-placed Bluey cake topper can be the perfect finishing touch on a simple blue frosted cake, giving you maximum character impact with minimal decorating stress!
Serving Your Bluey Birthday Cake
The big moment has arrived—it’s time to present your Bluey cake to the birthday child! Here are some tips for making the cake presentation extra special:
If possible, keep the cake hidden until the big reveal moment.
Consider adding sparkler candles for extra wow factor (with proper adult supervision, of course).
Have your camera ready to capture the birthday child’s reaction—it’s priceless!
For cutting, have a tall glass of hot water nearby to dip your knife in between slices for cleaner cuts.
Serve with blue and white ice cream for a color-coordinated dessert experience.
Remember that no matter how your Bluey cake turned out, the effort and love you put into creating it is what makes it special. I still laugh about the time my son’s Bluey cake ears fell off right before his party—we quickly dubbed it “Bluey playing hide and seek” and he thought it was the greatest thing ever!
Storing Leftover Bluey Cake
If you’re lucky enough to have leftover Bluey cake (though in my experience, character cakes tend to disappear quickly!), here’s how to keep it fresh:
Cut any remaining cake into individual slices.
Store in an airtight container at room temperature for up to 2 days.
For longer storage, place in the refrigerator for up to 5 days.
You can also freeze slices wrapped individually in plastic wrap and then aluminum foil for up to 2 months.
When ready to enjoy, thaw frozen slices in the refrigerator overnight.
Bluey Birthday Cake FAQ
Can I make this Bluey cake ahead of time?
Absolutely! You can bake the cake layers up to 3 days in advance. Wrap them well in plastic wrap once completely cooled and store in the refrigerator. You can also completely decorate the cake 1-2 days before the party and store it in the refrigerator. Just bring it to room temperature about 1-2 hours before serving for the best flavor and texture.
My frosting keeps melting while I’m trying to decorate. What am I doing wrong?
This is usually due to either warm kitchen temperature or butter that was too soft to begin with. Pop your frosting in the refrigerator for 15-20 minutes to firm up, then try again. Also, avoid decorating a cake near a hot oven or in direct sunlight.
How do I get that perfect Bluey blue color?
Gel food colors are your best friend here! For Bluey’s signature color, use a royal blue gel coloring with just a tiny touch of violet to get that slightly periwinkle-blue shade. Add color gradually—you can always add more, but you can’t take it away.
My child wants a Bluey AND Bingo cake. Any suggestions?
You could do a two-tier cake with Bluey on top and Bingo on the bottom tier. Alternatively, make a rectangular cake and decorate half as Bluey and half as Bingo. For a simpler option, make cupcakes with some decorated as Bluey and others as Bingo.
Can I use a box cake mix for my Bluey cake?
Absolutely! There’s no shame in using shortcuts when you’re already putting effort into decorating. To enhance a box mix, try substituting milk for the water, adding an extra egg, and mixing in a teaspoon of vanilla extract.
What if I completely mess up the decorating?
First, remember that kids are usually thrilled with any attempt at a character cake! But if disaster strikes, keep some blue sprinkles, extra Bluey cake toppers, or even small Bluey toys on hand as backup decoration. You can cover a multitude of decorating sins with strategic topper placement and a border of colorful sprinkles!
Your Bluey Cake Creation Awaits!
Creating a Bluey cake for your little fan is more than just baking—it’s making birthday magic happen! The look on their face when they see their favorite blue heeler transformed into an edible masterpiece is worth every minute spent mixing, frosting, and decorating.
Remember that perfect doesn’t mean professional—it means made with love and attention to what will make your child happy. Some of my most “Pinterest-fail” worthy cakes have been my kids’ absolute favorites simply because they featured characters they adored.
I’d love to see your Bluey cake creations! Drop a comment below with your experience, or share a photo of your finished Bluey birthday cake. Did you try any clever shortcuts or have any decorating disasters turned triumphs? Let’s celebrate our Bluey cake adventures together!
And if your little one is already planning their next birthday theme, let me know what character cake tutorials you’d like to see next. Until then, happy baking and “For real life!”
Hungry for more? Check out our top rated recipes :