Table of Contents
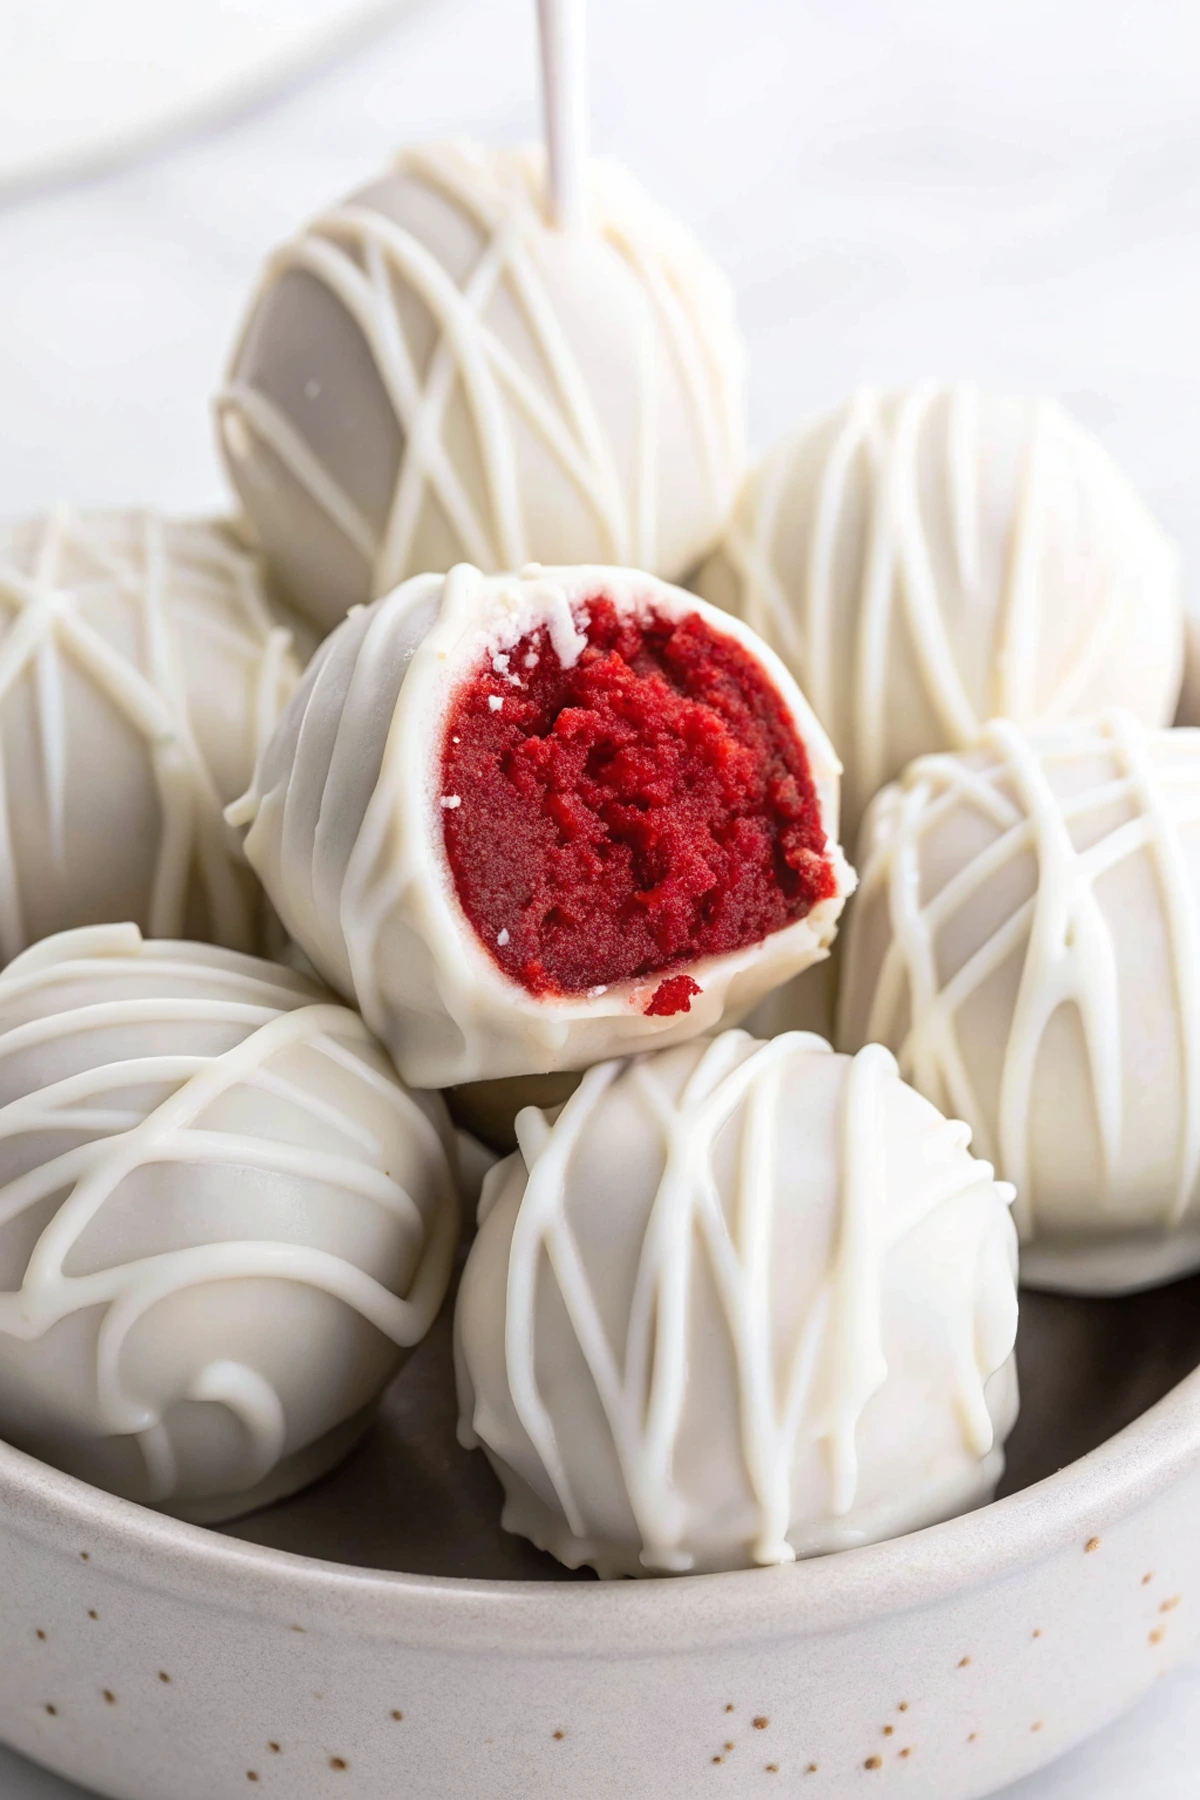
There’s something magical about biting into a red velvet cake pop – that perfect balance of tender cake, velvety frosting, and the satisfying crack of chocolate coating. I still remember the first time I made these little beauties for my niece’s birthday party. The kids’ eyes lit up, and honestly? The adults hovered around the dessert table just as eagerly!
Whether you’re a seasoned baker or just dipping your toe into the world of homemade treats, these red velvet cake pops are about to become your new favorite way to spread joy. They’re surprisingly simple to make, endlessly customizable, and they never fail to bring smiles. Plus, they solve that age-old problem of cake-to-frosting ratio – each bite is absolutely perfect.
I’ve spent years refining this red velvet cake pops recipe, learning all the tricks and shortcuts along the way. Today, I’m sharing everything I know to help you create these delightful treats without any of the frustrations or pitfalls that can come with cake pop making. So grab your mixing bowl and let’s create some magic together!
What Makes Red Velvet Cake Pops So Special?
Red velvet cake pops hold a special place in the dessert world, and for good reason! These crimson-hued treats aren’t just regular cake on a stick – they’re a complete dessert experience with a rich history and unique flavor profile.
Traditional red velvet cake dates back to the Victorian era, though it gained massive popularity during the Great Depression when Adams Extract company used the striking red color as a marketing tool. The subtle chocolate notes, slight tanginess from buttermilk, and that gorgeous red color made it an instant classic.
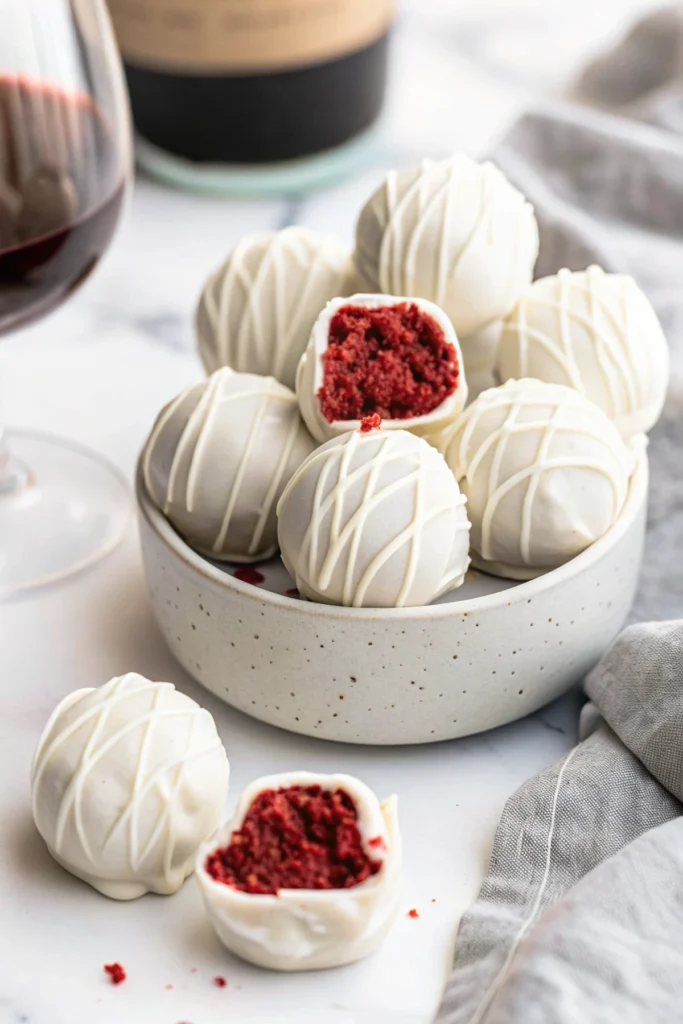
When transformed into cake pops, red velvet becomes even more irresistible. The dense, moist texture of red velvet cake blends perfectly with cream cheese frosting, creating that ideal consistency that cake pops need. The deep red interior creates a stunning contrast against the white or dark chocolate coating, making them visually spectacular for holidays like Valentine’s Day and Christmas.
What I personally love about the best red velvet cake pops is how they balance flavors and textures. They’re not overly sweet like some desserts can be – there’s a complexity there with hints of cocoa, vanilla, and that signature slight tanginess that makes red velvet so distinctive.
Ingredients You’ll Need
Creating spectacular red velvet cake pops starts with gathering quality ingredients. Here’s everything you’ll need to make these delicious treats from scratch:
For the Red Velvet Cake:
- 1½ cups all-purpose flour
- 3 tablespoons unsweetened cocoa powder
- 1 teaspoon baking soda
- ½ teaspoon salt
- ½ cup unsalted butter, softened
- 1 cup granulated sugar
- 2 large eggs, room temperature
- 1 tablespoon vanilla extract
- 1 tablespoon distilled white vinegar
- ¾ cup buttermilk, room temperature
- 2 tablespoons red food coloring (gel preferred)
For the Cream Cheese Frosting:
- 8 oz cream cheese, softened
- ¼ cup unsalted butter, softened
- 2 cups powdered sugar
- 1 teaspoon vanilla extract
For Assembly:
- 24 oz white chocolate melting wafers (or dark chocolate if preferred)
- 24-30 lollipop sticks
- Sprinkles, colored sugar, or other decorations
- Styrofoam block or cake pop stand (for drying)
If you’re in a pinch or looking for an easy red velvet cake pops recipe version, you can certainly use a boxed red velvet cake mix and pre-made cream cheese frosting. While homemade offers the best flavor, these shortcuts can still yield delicious results when you’re short on time!
I recommend using gel food coloring rather than liquid for the most vibrant red color without affecting the cake’s texture. And investing in good quality melting wafers will give you that perfect, glossy shell that doesn’t crack or become too thick.
Equipment Needed
Before diving into this red velvet cake pops recipe, let’s make sure you have all the right tools on hand to make the process smooth and enjoyable:
Essential Equipment:
- 9×13 inch baking pan (or two 8-inch round pans)
- Large mixing bowl
- Electric mixer (stand or handheld)
- Rubber spatula
- Measuring cups and spoons
- Cooling rack
- Cookie scoop (1½-inch diameter works best)
- Baking sheet lined with parchment paper
- Microwave-safe bowl for melting chocolate
- Lollipop sticks
- Styrofoam block, cake pop stand, or a box with holes punched in it (for drying)
Nice-to-Have Items:
- Food processor (speeds up the cake crumbling process)
- Cake pop mold (if you prefer perfectly round shapes)
- Narrow, deep container for dipping (like a coffee mug)
- Decorating bags and tips for additional designs
- Small bowls for different coating colors or sprinkles
I learned the hard way that having a proper drying setup is crucial! My first attempt at red velvet cake pops ended with several toppling over onto my counter because I tried balancing them in a drinking glass. A simple styrofoam block from any craft store works wonders, or even a cardboard box with small holes punched in the top!
The cookie scoop is another game-changer. It ensures all your cake pops are uniform in size, which means they’ll not only look professional but also cook and set at the same rate.
Step-by-Step Instructions
Making the Red Velvet Cake
Preheat and prepare: Set your oven to 350°F (175°C). Grease and line your cake pan with parchment paper.
Mix dry ingredients: In a medium bowl, whisk together the flour, cocoa powder, baking soda, and salt until well combined.
Cream butter and sugar: In a large bowl, beat the softened butter and sugar with an electric mixer until light and fluffy, about 3-4 minutes. Don’t rush this step – it’s what gives your cake its tender crumb!
Add eggs and flavoring: Beat in the eggs one at a time, then add vanilla extract. Mix in the vinegar and red food coloring until the batter is vibrantly red.
Combine wet and dry: Alternate adding the dry ingredients and buttermilk to the butter mixture, beginning and ending with the dry ingredients. Mix just until combined – overmixing will make your cake tough!
Bake the cake: Pour the batter into your prepared pan and bake for 25-30 minutes, or until a toothpick inserted in the center comes out clean.
Cool completely: Allow the cake to cool in the pan for 10 minutes, then transfer to a cooling rack to cool completely. This is crucial – working with warm cake will make your cake pops too soft.
Making the Cream Cheese Frosting
Beat the base: In a large bowl, beat the cream cheese and butter until smooth and fluffy.
Add sweetness: Gradually add the powdered sugar, mixing on low speed to avoid a sugar cloud.
Finish with flavor: Mix in the vanilla extract and beat until smooth and creamy.
Forming the Cake Pops
Crumble the cake: Once completely cooled, crumble the red velvet cake into fine crumbs. You can use your hands, but a food processor makes this super quick.
Mix with frosting: Start by adding about half the frosting to the cake crumbs, mixing with your hands or a spatula. Gradually add more frosting until the mixture holds together when rolled into a ball. You might not need all the frosting – the mixture should be moist but not soggy.
Shape the balls: Use your cookie scoop to portion the mixture, then roll between your palms to form smooth balls. Place them on a parchment-lined baking sheet.
Chill thoroughly: Refrigerate the cake balls for at least 2 hours, or freeze for 30 minutes. This crucial step ensures they stay intact during dipping.
Coating and Decorating
Melt the chocolate: Following package instructions, melt your chocolate wafers in a microwave-safe bowl. If the chocolate seems too thick, add a teaspoon of vegetable shortening to thin it.
Prep the sticks: Dip the tip of each lollipop stick about ½ inch into the melted chocolate, then insert it halfway into a chilled cake ball. This creates an “anchor” that keeps the cake pop attached to the stick.
Return to chill: Place the cake pops with inserted sticks back in the refrigerator for 15 minutes to set the chocolate anchor.
Dip and coat: Holding the stick, dip each cake pop completely into the melted chocolate. Gently tap the stick against the bowl’s edge to remove excess chocolate. Twirl slowly to help the coating settle evenly.
Add decorations: While the coating is still wet, add sprinkles or other decorations.
Dry properly: Stand the cake pops upright in your styrofoam block or cake pop stand to dry completely, which takes about an hour at room temperature.
I’ve found that keeping the chocolate warm but not hot is key to smooth coating. If it starts to cool and thicken, gently reheat it. And here’s my secret: I keep my cake balls in the freezer and only take out a few at a time for dipping. The contrast between the cold cake and warm chocolate creates a thinner, more even coating!
Tips for Perfect Red Velvet Cake Pops
Creating the best red velvet cake pops isn’t just about following a recipe – it’s about mastering the little techniques that take them from good to unforgettable. Here are my tried-and-true tips after years of cake pop adventures:
Getting the Texture Right
The crumb test: Your cake and frosting mixture should hold together when pressed without being sticky. If you can roll it into a ball that holds its shape but doesn’t stick to your hands like wet dough, you’ve nailed it.
Less is more with frosting: Start with less frosting than you think you need – you can always add more. Too much makes cake pops that are too soft and can fall off the stick.
Consistent sizing: Use a cookie scoop or food scale to ensure all your cake pops are the same size, which helps them set evenly and look professional.
Dipping and Coating Secrets
Temperature matters: Keep your cake balls cold and your chocolate warm (but not hot). This temperature difference helps the coating set quickly and smoothly.
The perfect dip: Submerge the cake pop in one smooth motion, and lift it straight out without swirling in the chocolate, which can loosen the cake.
Fixing cracks: If your chocolate coating cracks after dipping, your cake balls might be too cold. Let the remaining balls sit at room temperature for 5-10 minutes before dipping.
Thinning thick chocolate: Add a teaspoon of coconut oil or paramount crystals to chocolate that’s too thick for dipping.
Troubleshooting Common Issues
Cake balls falling off sticks: Make sure you’ve created that chocolate “anchor” by dipping the stick in chocolate before inserting it into the cake ball, and let it set completely.
Misshapen pops: If your perfectly round cake pops start developing flat sides, you’re likely rotating them too soon after dipping. Let them set up for a few seconds first.
Lumpy coating: If your chocolate looks lumpy rather than smooth, it may have overheated or gotten water in it. Always use dry utensils and be gentle with microwave heating.
I learned these lessons the hard way! My first batch of red velvet cake pops looked like lumpy strawberries because I rushed the process. Now I know that patience – especially with chilling times – is what separates cake pop disasters from cake pop masterpieces!
Delicious Variations on Red Velvet Cake Pops
One of the things I love most about this red velvet cake pops recipe is how versatile it is! Once you’ve mastered the basic technique, you can let your creativity run wild with these exciting variations:
Flavor Twists
Chocolate-Dipped Red Velvet: Instead of white chocolate, coat your cake pops in dark or milk chocolate for a more intense cocoa experience that complements the subtle chocolate notes in red velvet.
Cookies and Cream Red Velvet: Mix crushed Oreo cookies into your cake and frosting mixture for a cookies-and-cream twist on the classic.
Cheesecake-Stuffed Red Velvet: Create a small indentation in your cake balls and fill it with a tiny scoop of cheesecake filling before closing and dipping. It’s like a cake pop with a surprise inside!
Raspberry Red Velvet: Add freeze-dried raspberry powder to your cake mixture or frosting for a fruity spin that pairs beautifully with the chocolate notes.
Decorative Ideas
Tuxedo Red Velvet Pops: Dip half the pop in white chocolate and half in dark chocolate for an elegant tuxedo effect.
Marbled Red Velvet Pops: Drizzle contrasting chocolate over the base coat while still wet, then use a toothpick to create beautiful marbled patterns.
Holiday Themes: Adapt your decorations to the season – heart sprinkles for Valentine’s Day, green and red for Christmas, or pastel colors for Easter.
Wedding Cake Pops: Coat in white chocolate and decorate with edible pearl dust and gold accents for sophisticated treats perfect for wedding receptions or bridal showers.
Dietary Adaptations
Gluten-Free Red Velvet Cake Pops: Substitute your favorite gluten-free flour blend for traditional flour. Most cup-for-cup blends work beautifully in this recipe.
Vegan Red Velvet Pops: Use plant-based butter, flax eggs, and vegan cream cheese to create a completely plant-based version that’s just as delicious.
Reduced Sugar Option: Cut the sugar in the cake and frosting by up to a third without significantly affecting the texture. The chocolate coating provides plenty of sweetness.
My personal favorite variation came about by accident when I was making an easy red velvet cake pops recipe for a friend’s birthday. I ran out of regular sprinkles and used crushed freeze-dried strawberries instead. The intense berry flavor against the chocolate coating was an absolute revelation!
Make-Ahead and Storage Tips
One of the best things about these red velvet cake pops is how perfect they are for planning ahead. Here’s how to make them in advance and keep them fresh:
Make-Ahead Options
Cake preparation: You can bake the red velvet cake up to 3 days in advance. Wrap it tightly in plastic wrap and store at room temperature.
Cake balls: Form the cake and frosting mixture into balls and refrigerate them (uncovered) for 1 hour until firm. Then transfer to an airtight container with parchment between layers and refrigerate for up to 3 days before dipping.
Freezing unfrosted cake balls: Place shaped cake balls on a baking sheet, freeze until solid, then transfer to a freezer bag. They’ll keep for up to 6 weeks. Thaw in the refrigerator before dipping.
Storage After Completion
Room temperature: Completed cake pops can be stored at room temperature in an airtight container for 2-3 days. This is ideal for maintaining the perfect texture of the coating.
Refrigerator: Store in the refrigerator for up to 1 week. Be aware that refrigeration may cause some condensation on the coating when brought to room temperature.
Freezer: Finished cake pops can be frozen for up to 1 month. Place them in a single layer until frozen solid, then transfer to a container with parchment between layers. Thaw in the refrigerator, then bring to room temperature before serving.
Transportation Tips
Individual packaging: For parties or gifts, wrap each cake pop in a small cellophane bag tied with ribbon. This prevents them from sticking together and makes for a beautiful presentation.
Cake pop carrier: Invest in a specialized carrier or create your own by poking holes in a cardboard box lid at the right intervals to hold the sticks.
Temperature concerns: If transporting in hot weather, keep them in a cooler with an ice pack, but not directly touching the ice to prevent condensation.
I learned the importance of proper storage after bringing my red velvet cake pops to an outdoor summer party. The heat caused the chocolate to soften and the pops to droop sadly on their sticks! Now I always consider the environment where they’ll be served and plan accordingly.
Perfect Occasions for Red Velvet Cake Pops
These versatile treats are showstoppers for virtually any gathering. Here’s where your red velvet cake pops will truly shine:
Holiday Celebrations
Valentine’s Day: The deep red color makes these perfect for the day of love. Add heart-shaped sprinkles or drizzle with pink chocolate for extra romance.
Christmas: Decorate with green sprinkles or crushed candy canes for a festive holiday treat that looks gorgeous on cookie platters.
Fourth of July: Add blue and white sprinkles to your red velvet base for a patriotic dessert that’s perfectly portion-controlled.
Special Events
Weddings: Elegant cake pops make perfect wedding favors or dessert table features. Consider customizing colors to match your wedding theme.
Baby Showers: Gender reveal parties are perfect for these treats – coat some in blue and some in pink, with the interior color matching the baby’s gender!
Graduation Parties: Decorate with the graduate’s school colors for a personalized touch that’s easier to serve than traditional cake.
Everyday Joys
Lunchbox Treats: Cake pops are the perfect size for tucking into lunch boxes for a special midday surprise.
Office Celebrations: Individually wrapped cake pops are ideal for workplace birthdays where shared cake can get messy.
Family Movie Night: These handheld treats won’t spill during your favorite film – perfect for kids and adults alike!
I once made a batch of these easy red velvet cake pops for my daughter’s dance recital. The girls were thrilled to have a special treat that didn’t risk getting frosting on their costumes before the big performance! Sometimes the practical benefits are just as important as the delicious taste.
Frequently Asked Questions
Why did my cake pops fall off the sticks?
This usually happens when the cake balls aren’t chilled enough or when the chocolate anchor isn’t fully set. Make sure to refrigerate your cake balls for at least 2 hours before dipping, and after inserting the chocolate-dipped sticks, give them 15 minutes in the refrigerator to set properly.
How do I prevent cracks in my chocolate coating?
Cracks typically form when there’s a dramatic temperature difference between your cold cake balls and the hot chocolate. Let your cake balls sit at room temperature for about 5-10 minutes after removing from the refrigerator, and make sure your melted chocolate is warm but not hot.
Can I use a cake mix for this red velvet cake pops recipe?
Absolutely! While homemade cake provides the best flavor, a boxed red velvet cake mix works perfectly for a quick and easy red velvet cake pops recipe. Just prepare according to package directions, then follow the rest of the instructions as written.
How far in advance can I make cake pops for an event?
Fully completed cake pops can be made 3-5 days in advance when stored properly at room temperature in an airtight container. For longer storage, you can freeze the uncoated cake balls for up to 6 weeks and then dip them closer to your event.
Why is my coating too thick?
If your coating is too thick to work with smoothly, try adding 1 teaspoon of vegetable shortening or coconut oil per cup of melting wafers. Stir until completely melted and smooth. Be careful not to add water, which will cause the chocolate to seize.
Can I make red velvet cake pops without food coloring?
Yes! For a natural alternative, you can use 2 tablespoons of beet powder in place of red food coloring. The color won’t be quite as vibrant, but it provides a lovely natural reddish hue and adds minimal flavor to the cake.
How do I get perfectly round cake pops?
After rolling your cake balls by hand, refrigerate them for 30 minutes. Then re-roll them between your palms, applying gentle, even pressure. The chilled mixture will hold its shape better and allow you to smooth out any imperfections.
Time to Create Your Red Velvet Masterpieces!
There you have it, friends – everything you need to create absolutely stunning red velvet cake pops that will have everyone asking for your secret recipe! From the velvety cake to the smooth chocolate coating, these treats truly are little bites of joy.
Remember, the key to the best red velvet cake pops is patience. Don’t rush the chilling steps, and give yourself grace if your first batch isn’t picture-perfect. Like any baking skill, cake pop making gets easier with practice!
I’d love to hear how your red velvet cake pops turn out! Did you try any of the variations? Did you discover any helpful tricks of your own? Drop a comment below and share your experience or any questions you might have.
And if you’re feeling proud of your creation (as you should be!), snap a photo and tag me on social media. Nothing makes me happier than seeing your kitchen successes!
Until next time, happy baking and enjoy every delicious bite of these irresistible red velvet treats!
Hungry for more? Check out our top rated recipes :
- How to Make a Crumbl Cookie Recipe at Home:Best Recipes of 2025
- Strawberry Oreo Crunch Cake: A Delicious Twist on a Classic
- No Sugar Chocolate: How to Make the Best Sugar-Free Chocolate at Home
- How to Make Irresistible Chocolate Covered Potato Chips at Home

Red Velvet Cake Pops
Ingredients
- For the Red Velvet Cake:
- 1½ cups all-purpose flour
- 3 tbsp unsweetened cocoa powder
- 1 tsp baking soda
- ½ tsp salt
- ½ cup unsalted butter softened
- 1 cup granulated sugar
- 2 large eggs room temperature
- 1 tbsp vanilla extract
- 1 tbsp distilled white vinegar
- ¾ cup buttermilk room temperature
- 2 tbsp red gel food coloring
- For the Cream Cheese Frosting:
- 8 oz cream cheese softened
- ¼ cup unsalted butter softened
- 2 cups powdered sugar
- 1 tsp vanilla extract
- For Assembly:
- 24 oz white chocolate melting wafers
- 24-30 lollipop sticks
- Sprinkles for decoration
Instructions
- Bake the Cake: Preheat oven to 350°F (175°C). Grease a 9×13″ pan. Whisk dry ingredients (flour, cocoa, baking soda, salt) in a bowl. In another bowl, cream butter and sugar until light and fluffy. Beat in eggs one at a time, then vanilla, vinegar, and food coloring. Alternately add dry ingredients and buttermilk to the wet ingredients, mixing until just combined. Pour into pan and bake for 25-30 min. Cool completely.
- Make Frosting: Beat cream cheese and butter until smooth. Gradually add powdered sugar, then vanilla, and beat until creamy.
- Form Balls: Crumble the cooled cake into fine crumbs. Gradually mix in frosting until the mixture holds together when rolled. Roll into 1.5-inch balls using a cookie scoop and place on a parchment-lined sheet. Chill for at least 2 hours.
- Coat & Decorate: Melt chocolate wafers. Dip the tip of a lollipop stick into chocolate and insert halfway into a cake ball. Chill for 15 min to set the “anchor.” Dip each pop completely in melted chocolate, tap off excess, and decorate with sprinkles. Stand upright in a styrofoam block to set completely (about 1 hour).
Notes
- Shortcut: Use 1 box of red velvet cake mix and 1 can of cream cheese frosting for a quicker version.
- Texture is Key: The cake-frosting mixture should hold its shape without being sticky. Start with less frosting than you think you need.
- Chilling is Crucial: Don’t skip chilling the cake balls or setting the chocolate anchor—this prevents them from falling off the stick.
- Smooth Coating: Keep cake balls cold and chocolate warm (not hot) for a thin, smooth shell that doesn’t crack.
- Variations: Try coating in dark chocolate, mixing in crushed Oreos, or using natural beet powder instead of food coloring.
- Storage: Store completed pops in an airtight container at room temperature for 2-3 days or freeze for up to 1 month.